|
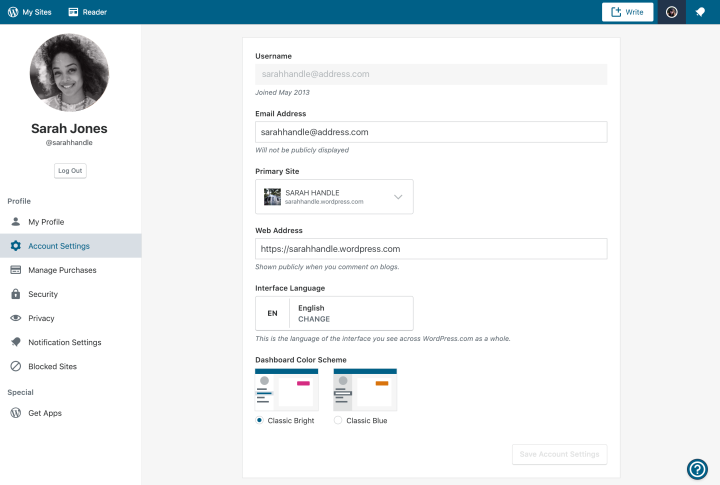
We're glad to declare new upgrades to your WordPress.com dashboard for an increasingly available and altered understanding. From your work area, you would now be able to alter your dashboard by picking one of our two new shading plans, Classic Bright for a new present day feel and Classic Blue as the standard you've known and cherished. As a major aspect of our pledge to comprehensive structure, these new hues have been advanced for higher balance and expanded readability with a differentiation proportion of at any rate 4.5:1. 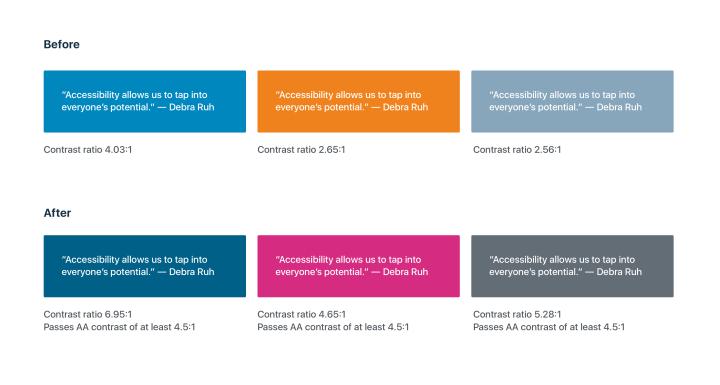 Color 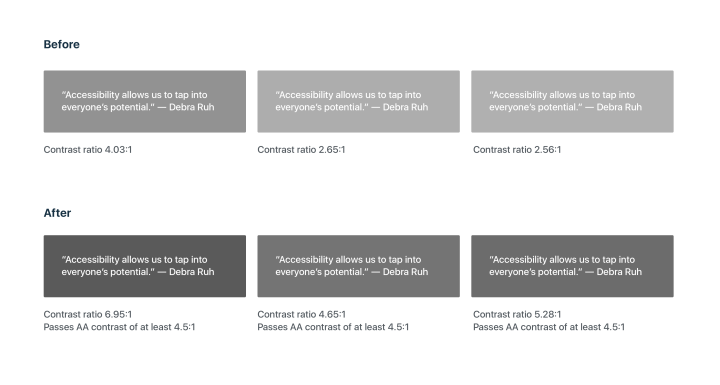 Grayscale We'll before long be presenting extra shading plan choices that will proceed with our main goal of a superior progressively available web for everybody. Here's the way to redo your shading plan:
 Our WordPress Customer Support team provides the finest solutions to all your problems which you are facing while using Wordpress. Call us on wordpress customer service number +1-877-863-5655 from anywhere in United States. You may visit our website for more information about WordPress Customer Support. https://www.wordpresssupport247.com/wp-support-phone-number Have ideas for color schemes you’d like to see? Please comment below. TAGS:wordpress support number,wordpress customer service number,wordpress support phone number,contact wordpress support,Wordpress Customer Support Number,wordpress support phone number united states
1 Comment
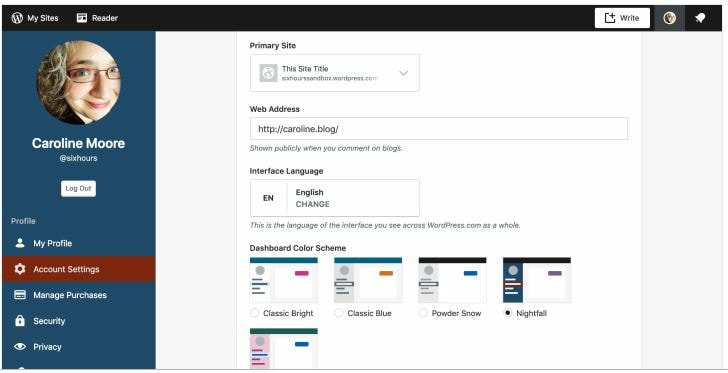
Your site's dashboard ought to be as inviting to you as your site's landing page is to your guests. One approach to do that? Modify your WordPress.com dashboard with shading plans. Today, you have three new choices for including a little in the background punch: presenting Powder Snow, Nightfall, and Sakura, structured particularly for you by our Art Director, Eriko Kawakami. Regardless of whether you favor the delicate monotone of Powder Snow, the darker and relieving shades of Nightfall, or the dynamic, cherry-bloom enlivened Sakura, we trust you'll discover a look you cherish.  As a feature of our promise to comprehensive structure, the new palettes are upgraded for difference and expanded readability. Whichever shading plan you pick, your dashboard will be beautiful and comprehensible. Here's the means by which to modify your shading plan:
 More shading plans are coming, and we need your input! What hues would you like to find in your WordPress.com dashboard? Wordpress is an open source content management system (CMS) which is freely available online. You can build any kind of website very easily on WordPress. For all types of Wordpress Support services you can easily contact us on WordPress Support Number +1-877-863-5655. It is toll free and available 24*7. https://www.wordpresssupport247.com
It is essential for every website to be capable of providing a great user experience in order to be successful. If you aim to attract a significant amount of traffic on your site, you not only need to ensure relevant content but also keep the user experience at its best. One such way to do that is to use WordPress popups on your WordPress website. Talking about UX, including popups can add to the convenience of your users along with enhancing the chances of a sale. Not just that, but accordingly, WordPress popup can also help increase the conversion rate. This guide is going to cover everything that you need to know about including popups in your WordPress site. Firstly, here are a few statistics that reflect the advantages you can get out of using popups.
Why use popups on your website?  WordPress popup is indeed a proven aspect of a website in catering the user’s convenience, attracting traffic and also providing the owner with a higher scale of sales. Here are a few benefits of adding popups to your WordPress website.
How to add Popup using plugin? After reading all the whooping statistics of integrating popups to the WordPress website, you definitely would not want to lag in the game of revenue generation. If you have a WordPress website, you can get plugins from WordPress.org without spending any cost. Moreover, there are various other platforms as well from where you can get your hands on plugins as per your requirements. All you need to do is install popups from WordPress site itself or from various other reputed platforms that provide plugins for popups. For you, here are the steps to add WordPress popup to your website using a plugin. Step 1: Head over to “Plugins.” Step 2: Click on “Add New.” Step 3: Now you need to search for “WordPress popups.” Step 4: When the search is complete, click on “Install.” Step 5: Once the plugin installation is complete, you need to activate it to make it functional on your website. You can also install WordPress Popups plugin called Wp-Exit Popup You will then notice a new menu created on your WordPress website called, “Popup.” Here you can see all your existing popups and also the new ones. This menu is the place from where you can control the settings of your website’s popups. Step 6: Go to “Popup.” Step 7: Then click on the “Setting” menu. This will allow you to configure the popups accordingly. Furthermore, you will also be able to choose which shortcut works the best with your WordPress popups. Best practices to make your popups more effective Now that you’re aware of the process of adding popups, here are some of the essential factors to keep in mind while creating a popup for increase conversion and traffic. Make sure to keep the followings things in mind whenever you’re planning to use pop-ups for your WordPress site.
This practice might give the user a bad first experience of your website and eventually lead him to leave your site without conversion. Do not let the user leave with a wrong impressionAnother tactic is to include the display of your popup when a viewer is about to leave your website because it is considered that, you have nothing to lose at that moment. However, this can sometimes give the user an inadequate expression of your site in a way that he might never return. Avoid when the user is midway reading the contentSome website owners try to display a popup after a specific period of time like after 60 seconds of the user being on your website. At that moment, your user may be halfway an article or any other information published on the site and a popup at that moment may disrupt your viewers’ concentration. This might make your content near to ineffective to your viewer. Here’s how you need to include the popup The above three ways of displaying WordPress popups on your website may increase bounce rates. What you need to do is, show your popup when your user is done with an article. This will not cause hindrance to the user’s concentration and also lead the reader towards conversion.
This not only spoils the UX but also your users might consider you desperate and irrelevant. If you do not want your viewers to get irritated, you need to display your popup just once and that too with a spot on timing.
 Regardless of the frequency of your popup being displayed, your visitors do not want to see any unworthy design placed in a secluded corner. So, to give the most of it to your users, you should incorporate good designs. You need to make use of bright colors, clear headlines, relevant images, and content in order to ensure a decent appearance. This will somewhat hold your viewer from leaving your website instantly or being irritated. In fact, a good design can effectively make them interested in the popup. This not only promotes conversion but also results in a better scale of revenue of generation.
 When you put bulky content in your WordPress popups, there is a very less chance of the users reading it paragraph by paragraph. If you want your viewer’s attention, you need to use short and catchy headlines. The more attractive your headlines are; the more subscribers you will attract. Your headlines must talk to the users so that they need not get into reading the whole thing. This will increase the rate of conversion and end up to be a profitable deal for your business
Also, additional information like what goes where will increase the level of confidence of the user on your website. And, to make it easier for the user, make sure to keep the “submit” button stand out. Many a time, a user may leave your website while filling up the form because they could not figure out how to submit, you would not want that to happen at any cost.
For example, if you post articles related to cricket on your website, most viewers will be people who have significant interests in this sport. In this case, displaying WordPress popups about hockey will not only make the user disinterested but also they might want to leave right away. Takeaway: WordPress popup for your website seems to be a very active and useful way of increasing the rate of conversion and the number of subscribers. The right use of popups can result in the enhanced scale of revenue. Your credibility on the world wide web can go from zero to hundred in very less time. User experience is something that can do wonders for your website; a good UX can make the users love your site and visit it on a regular basis, they may also turn to be a customer. So, make sure you’re making effective use of them. Get the best support on WordPress which help you to solve your Popup issues. Our WordPress Support team provides the finest solutions to all your problems which you are facing while using Wordpress. contact wordpress support on WordPress Support Number +1-877-863-5655 from anywhere in United States. You may visit our website for more information about WordPress Support. TAGS:wordpress support,wordpress support service,contact wordpress support,wordpress support united states,wordpress support number,wordpress customer service number,wordpress support phone number,contact wordpress support,Wordpress Customer Support Number,wordpress support phone number united states.
As prevalent as it would be, WordPress is an extremely reliable and stable system that one can use, irrespective of the knowledge level. However, the ease of use might get impacted by certain errors. At times, these errors can be very odd for beginners, such as white screen, internal server, too many redirects in WordPress, and more. Generally, such specific problems are generated because of external sources, considering that the core programming of this platform is quite solid. When talking about external sources, they can come in several forms, including the themes and plugins that are incompatible with the WordPress version you’re using. As a result of it, an error that states too many redirects might appear on your screen, leaving you confused and scratching your head. When this error pops up, you must know that your website isn’t functioning properly. Moreover, in different browsers, it appears differently. If you’re using Google Chrome, it displays This webpage has a redirect loop error. And, if you’re using Firefox, the screen will display that The page isn’t redirecting properly. So, what exactly are these errors about and what can you do when you experience them? This tutorial is to guide you through the meaning of too many redirects and how you can fix them. What Is the ERR_Too_Many_Redirects Error? 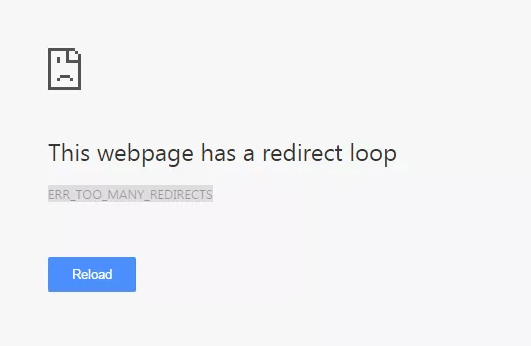 The reason behind this error is pretty much how it turns out to be. Usually, this error means that your WordPress settings have some misconfiguration that is making the site to go into an infinite redirection loop. If it happens, your site won’t stop redirecting from one page to another, and you might find your website to be stuck. And, unlike other kinds of errors, this one may not resolve on its own. As mentioned above, it might appear differently to you, based on the browser that you’re using. What Causes Too Many Redirects in WordPress? Considering that WordPress comprises an SEO friendly URL structure that uses the redirect function, there are several other well-known plugins that follow suit. For instance, there are several SEO plugins for WordPress that let you remove the category base right from the category URLs. This can be done by simply redirecting visitors to a URL that doesn’t come with any category base. And then, there are cache and SSL plugins that use redirects as well. Because of misconfiguration in any of these tools, your site might redirect visitors to such a URL that is redirecting them back to another referring URL. In such a situation, the browser of the user will be trapped between two pages; hence, showing up this error. Getting Caught Up in the Loop: Often, such error messages appear because of a misconfiguration in the settings; however, there are times when reasons can be complicated than that. You may see this error if:
While these may seem like simple settings, they can easily breakdown your entire website and cause redirect issues. Apparently, fixing these problems on your own is how you can regain access to your website. How to Fix Too Many Redirects Error? Before you even begin with fixing this error, you’d need these two significant things: Hosting control panel or FTP access WordPress admin area access (this one is optional, though) Once you’ve got the access, start with these steps- Step 1 – Checking the settings of URL The primary thing that you must do while troubleshooting the error is to scrutinize the URL settings. There are two different ways to do so:
For this, go to the WordPress admin area and click on Settings. Here, your General Settings will appear on the screen. Next, check the WordPress Address (URL) and Site Address (URL). You need to ensure that the URL here is correct. If not, make adequate changes and click the Save button. 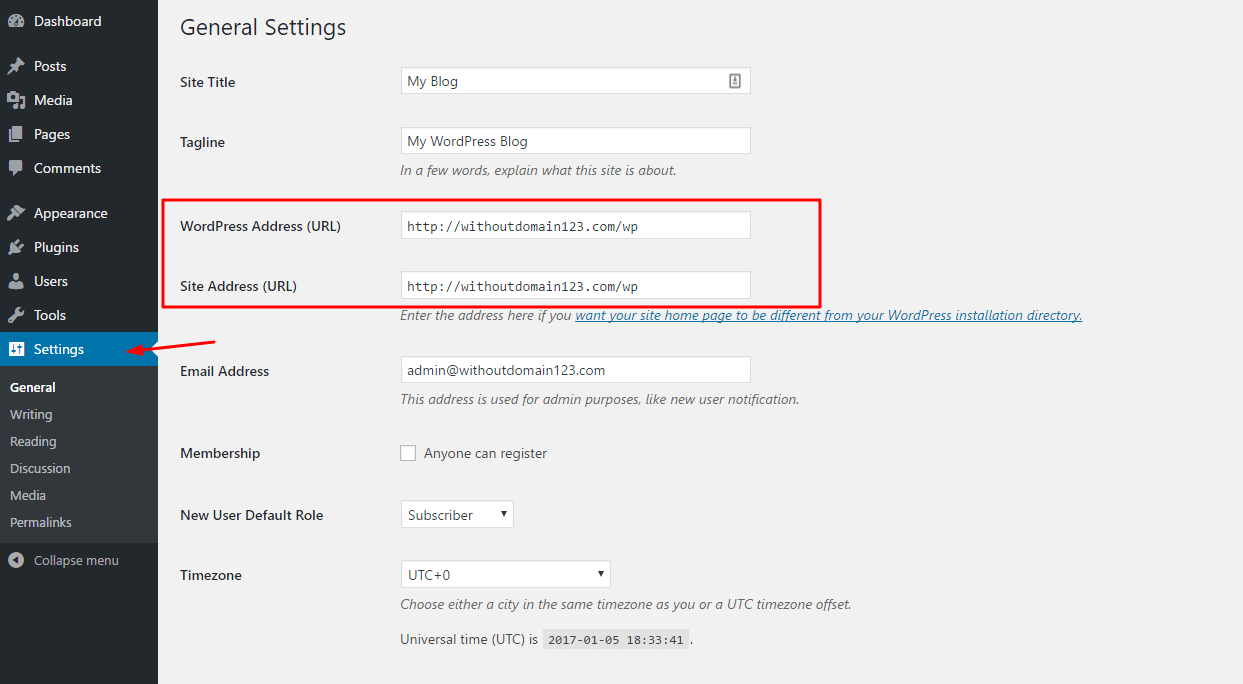
There are chances that you might not get access to the WordPress installation admin area. In this situation, you can consider changing the URL settings through the wp-config.php file. Here is a way through which you can edit the file through the file manager-
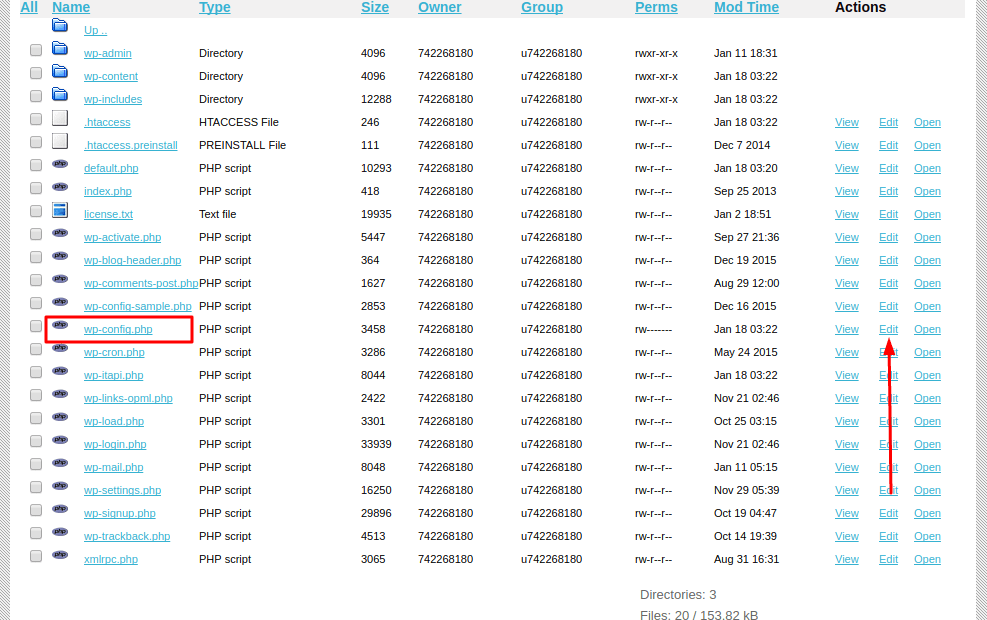
define( ‘WP_HOME’ , ‘http://example.com’); define( ‘WP_SITEURL’ , ‘http://example.com’);
Step 2 – Disable Plugins: Another considerable reason that may cause too many redirects for WordPress is outdated or corrupt plugins. Thus, it’s recommended to disable these plugins and try to regain access to your website. Follow this easy and quick way to disable plugins through your hosting provider:
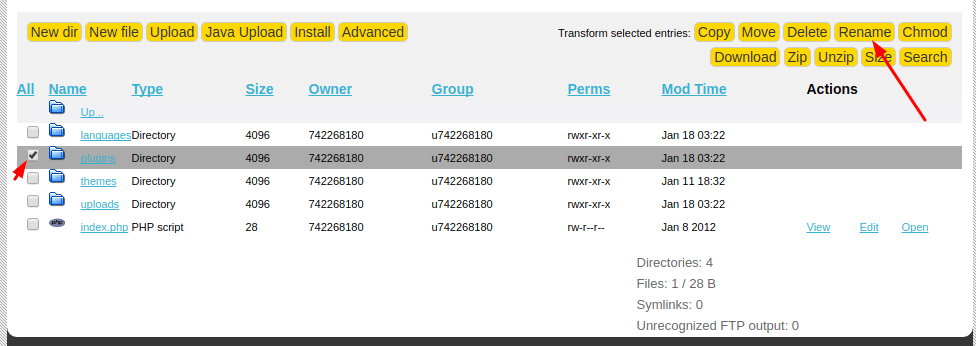
 Once you’ve renamed the folder, try accessing the site. If the error has been eliminated, there are chances of corrupt or outdated plugins being available in your site. To fix this, try removing some recent plugins and rename the folder to Plugins. Step 3 – Disabling .htaccess file- Another possible reason that might make your site go into the redirection loop would be certain settings in the .htaccess file. In such a case, you’d have to disable the .htaccess file to regain the site’s access. To do so, follow these steps: Access File Manager through the hosting control panel Select .htaccess file Right click on it and select Rename Rename the file to anything else 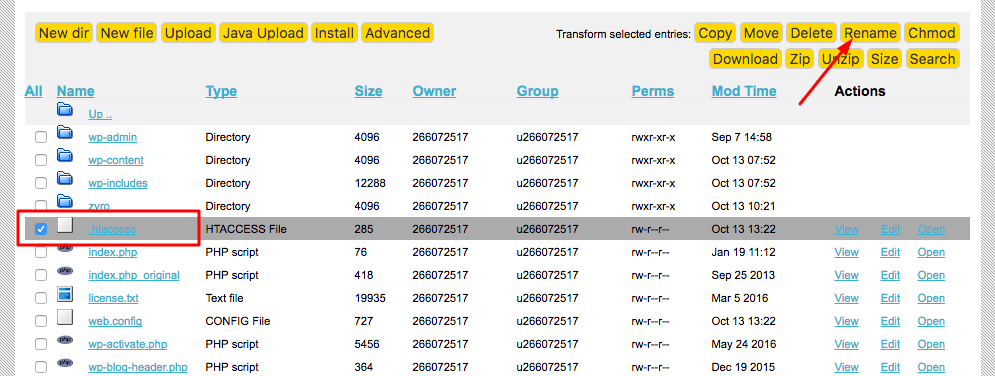
If your site works, try having a look at the configuration of the .htaccess file. Press the Edit option and use the default configuration. All you’d have to do is delete all the content from the renamed file and paste this: # BEGIN WordPress <IfModule mod_rewrite.c> RewriteEngine On RewriteBase / RewriteRule ^index.php$ – [L] RewriteCond %{REQUEST_FILENAME} !-f RewriteCond %{REQUEST_FILENAME} !-d RewriteRule . /index.php [L] </IfModule> # END WordPress After this, rename the file back to .htaccess. If the website starts working, it’s confirmed that the issue was caused by an incorrect configuration in the .htaccess file. Conclusion: When you’ve understood why too many redirects WordPress happen, fixing them won’t be a hassle for you. Basically, there is nothing that you cannot fix on your own. So, if you’ve come across this error once and didn’t know how to bring things back on track, well, now you have all the ideas. You can easily apply these methods and fix everything that might be troubling you and your users. Also, do let us know if you came across this error before and how did you fix it in the comments section. Wordpress is an open source content management system (CMS) which is freely available online. You can build any kind of website very easily on WordPress. For all types of Wordpress Support services you can easily contact us on WordPress Support Number +1-877-863-5655. It is toll free and available 24*7.
 Slow websites deter visitors. In fact, a recent survey reported that 35% will wait 3-5 seconds, 20% will wait less than 3 seconds, and 7% expect an immediate load. Only 38% said they would wait any longer. Ideally, you want a two-second load. In this article you will learn Optimizing WordPress Sites. And, in addition to losing visitors/customers, search engines punish sites when potential visitors leave before a load finishes. Thus, you stand to lose even more traffic. How do you optimize your site? Here are easy and immediately actionable steps you can take right now. 1. Determine Current Speed of Your Site When you load you own site, it may seem just fine in terms of speed. But here’s the thing: your browser has already cached it. The same is not true for new traffic. You want an “outside” measure of each of your pages. And there are services that will do this for you – Gtmetrix, Pingdom, YSlow, and Google PageSpeed Insights, for example. Before you do any other optimization tweaks, check your speed. And, after you modify or add anything to your site, check it again. If you can get three seconds or under, you’re “good to go.” 2. Your Web Host Does Matter You cannot hope to speed up your website, if you are hosted by a server that is slow. This is a key step in optimizing your site, so do some sound research. There are a number of online resources that have rated hosts according to key factors. Choose one that is recommended by experts who have either tested hosts or have surveyed reputable users of them.  3. Theme Optimization You need a fast theme. There are plenty of themes out there with lots of features that will make you job of setting up a website much easier. The trade-of is that the browser and web server must work harder to load it. This adds precious seconds to load time. D5 Creation Themes have a great balance here – great designs that are still lightweight and fast. There are hundreds of options, and each has a demo to view. Be mindful that each feature you have or add adds time. If there are features that you are not using, dump them. And if you cannot tweak code or don’t want to hire a developer to do it, then choose a theme without so many options. And choose a responsive design. These load fewer resources for mobile devices, and images are automatically suitable for any device. These sites are also now preferred by search engines. 4. About Those Plugins Again, minimize the plugins you use. Make decisions about which are really necessary. While a lot of plugins may not slow down your site significantly, some of them may not “behave” well, especially if they are not optimized for the most current version of WordPress. If you see a plugin with fewer than a three-star rating, avoid it – chances are it was not well-developed and could affect speed and the functions of your other plugins. And, for those plugins you do use, be certain you have the latest updates, including patches and security features. 5. Widget Optimization Widgets should be easy to load and light. Most WordPress themes are set up for widgets, which can be dragged and dropped into an area designed for them, usually the sidebar, but they can be placed in other places as well. Some widgets will not be updated often, and, if this is the case, ten upload them directly to your server. This will improve your load time, because you don’t have to rely on external servers. 6. Optimizing Static Content Compressed files are obviously smaller, and they load faster. If you have content that is consistently present, then you should optimize it through compression. The preferred option for WordPress is gZip. Just enable it through your cPanel. You can also use the W3Total Cache WP plugin. Use a CDN. This allows all of your static content to be served via CDN servers all over the world. Thus, when a visitor accesses your site, it will be loaded by the server that is closest to that visitor. And your own web server then has far less load to bear. Many hosting plans offer CDN – use one that does. 7. Image Optimization Images are heavy site elements. There are a few things you can do here.
8. Optimizing Your Database WordPress sites load from a MySQL database. That database accumulates information which, over time, you no longer need. Removing this un-needed information will improve your site performance. This can be accomplished via phpMyAdmin, or you can use a plugin for the purpose. 9. Use Caching Here is what caching does. When a visitor first comes to your website, your WordPress pages are loaded by retrieving information from your database and your CSS files. All of this is combined into an HTML file which can then be loaded into the visitor’s browser. And all of this takes time to do. When you enable caching, your HTML files remain available to that visitor when he returns, saving a lot of load time. Caching is valuable for high traffic sites specifically. And there are any number of plugins for this purpose. Just be certain that you have chosen a theme that supports plugins. D5 Creation, for example, has coded all of its themes to maintain WordPress standards. So, any standard plugin should run without an issue. 10. Use P3 Profiler This is a tool you can use to check out which plugins are slowing your site. You’ll get a report showing the exact amount of time each plugin adds to load. It will be easier to decide which ones to dump, once you see a report. Wordpress is an open source content management system (CMS) which is freely available online. You can build any kind of website very easily on WordPress. For all types of Wordpress Support services you can easily contact us on WordPress Support Phone Number +1-877-863-5655. It is toll free and available 24*7. TAGS:wordpress support,wordpress support service,contact wordpress support,wordpress support number,wordpress customer service number,wordpress support phone number
W3 Total Cache In Admin Panel, go to Performance > Dashboard and press the empty all caches button in the top button bar  WP Super Cache In Admin Panel, go to Settings > WP Super Cache and press the Delete Cache button. 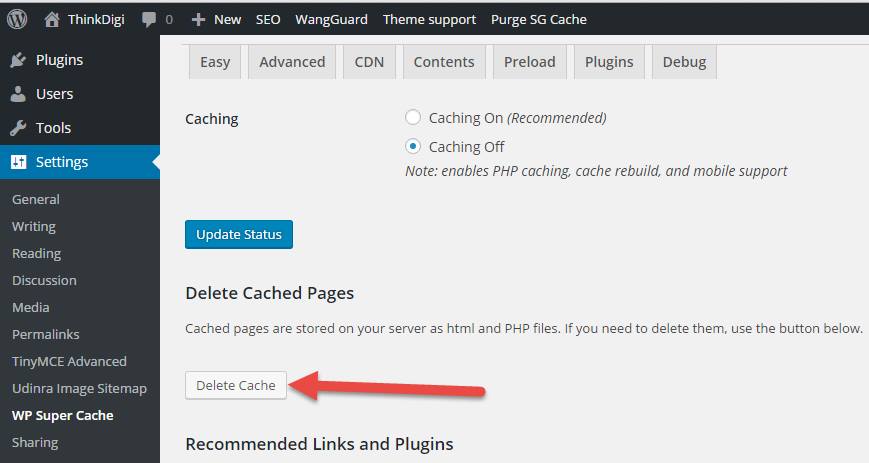 WP Fastest Cache Clearing cache in WP Fastest Cache plugin is incredibly easy. Just login to your WordPress admin dashboard and click the WP Fastest Cache menu item. On the next screen, hit the Delete Cache tab, and then click either the Delete Cache or Delete Cache and Minified CSS/JS button. 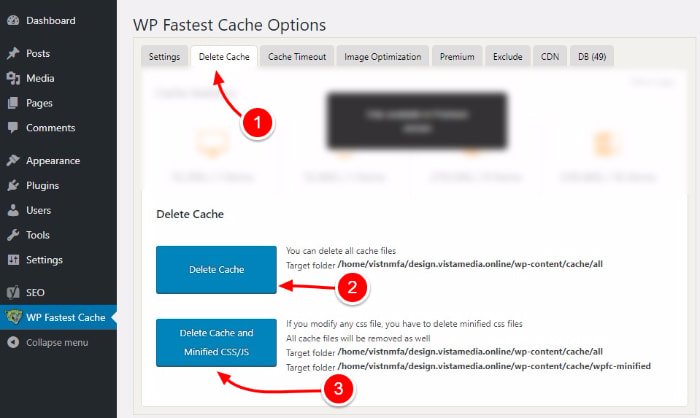 3. Clearing Cache from the CDNs: CDN is a better way to speed up your WordPress Sites. Free Plan of CloudFlare if awesome. Check the links below to the support URL’s showing you how to clear your cache for some of the two most widely used CDN’s by WordPress sites 4. Clearing the Browser Cache: Web Browsers also cache the Static Contents of your site. So, You need to Clear them, too.Below are the links to the tutorials on how to clear the cache for the most popular web browsers Wordpress is an open source content management system (CMS) which is freely available online. You can build any kind of website very easily on WordPress. For all types of Wordpress Support services you can easily contact us on WordPress Support Number +1-877-863-5655. It is toll free and available 24*7. Clear wordpress site cache  After Theme and Plugin Updating – Make Sure to Clear All Caches Have you changed your site’s Theme, Plugin, CSS, JavaScript or Published a New Post but can not see the changes? Well, this is most likely a WordPress Cache Issue. But fret not, turns out you can clear cache in WordPress in minutes and without breaking a sweat. Site Caching will greatly speed up your WordPress Site but may cause issues after Updating Themes and Plugins. So, you should Clear/Purge/ Flush the Cache every time you update any Theme and/or Plugin. You may search the website using clear cache from website and find tons of articles. But, here we have tried to describe about caching and clearing the cache for WordPress Sites. What is Cache? If this is your first time, the concept of caching might scare the living daylights out of you. So,ladies and gentlemen, what constitutes cache? In computing, caching is storing data in temporary memory (as opposed to the main memory), so you can retrieve it in a faster manner the second time you need it. You can also think of “cache” as the saved data, even though browsers prefer to call this “Cached Data/Files”, but that is besides the point. As far as WordPress websites go, caching involves saving a site’s static files on your browser or on the server side. Caching in this case usually involves saving files that change rarely if at all. You know, things like your images, CSS, JavaScript files and so on. But why cache your WordPress site? What’s the use in the first place? This question ushers us to our second section. How Does Cache Work? Cache works like magic. No really, jokes aside. In one line, cache makes your WordPress faster. How? You ask. To comprehend how WordPress cache works, it’s paramount that you understood the basic inner workings of how WordPress builds the pages and posts your see in your browser. Whenever you load a post or page, your browser gathers different files from your server to build the said page/post. Yes, the page/post you see is, for lack of a better word, “computed” from various files. Gathering these resources, oftentimes from different servers, takes time. You see, the browser sends HTTP requests to the server, where they are processed before the server responds with the requested resources (files, queries, logic etc). Now, cache is the in-between mechanism that eliminates this round trip. Instead of loading the same resources from the server all over again, your browser loads the cached copy of that site. The direct benefit is reduced internet traffic congestion and server load, which results in faster page load speeds for your website. This is purely because, according to the guys over at Computer Hope, accessing data from cache can be thousands of times faster than accessing the same data from the origin server (read hard disk). See, we said this caching business is easy stuff. We have also seen websites using CloudFlare Always Online™ cache to create an illusion of being online, while the entire website is offline. In one case, the entire static content was there, but we couldn’t access videos and elements such as forms, search and so on. However, if caching means good things for your page speeds and user experience, why would you want to clean cache in WordPress? You get the honest answer in the next section. 1. Clearing Hosting Controlled Cache: Some Hosting Services have their own Caching System to reduce their server load. Some of them have aggressive Caching System which is not suitable for WordPress Environment. Some hosting uses Server Side Caching which can not be controlled from the WordPress Dashboard by any Plugin. We don’t recommend such those hosting. GoDaddy / Media Temple To clear your GoDaddy or Media Temple Cache use the Flush Cache link located in the WordPress Admin Bar. 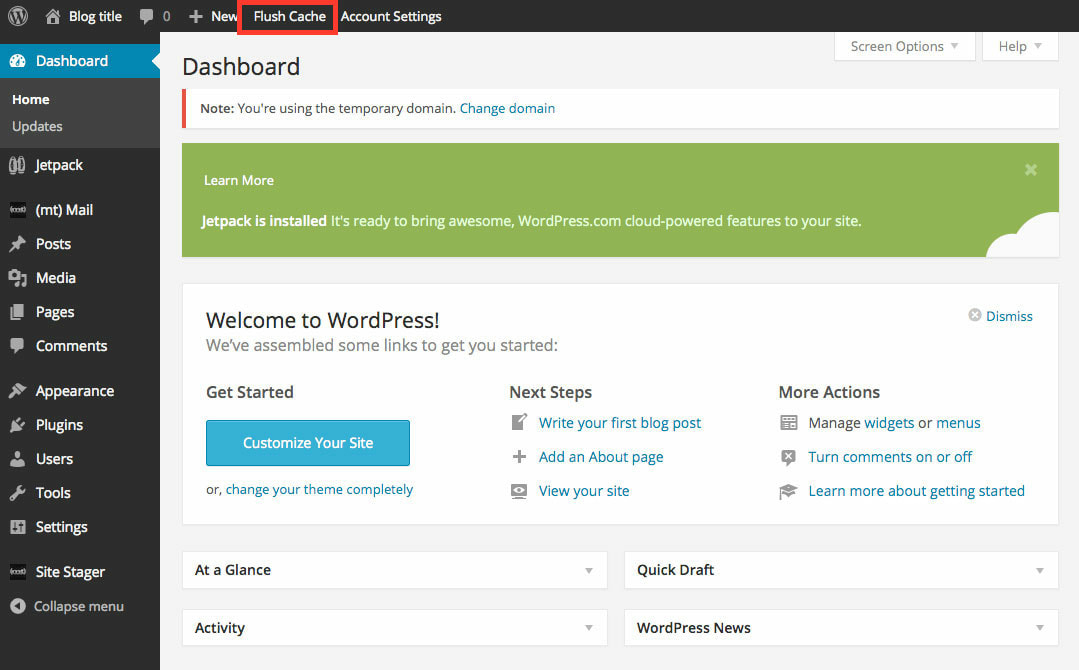 WP Engine The button to clear your cache in WP Engine is located in it’s own admin panel at the top of the WordPress Dashboard. 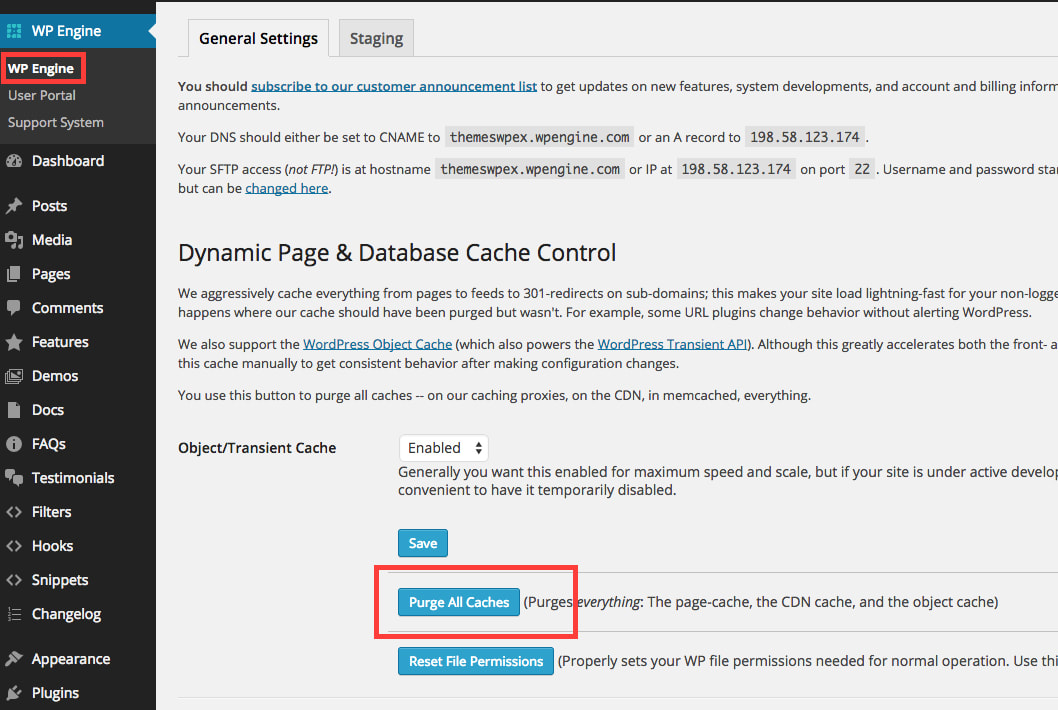 Site Ground Site Ground’s SuperCacher has it’s own Admin Panel that lets you quickly clear all the cache and also lets you enable AutoFlush and Dynamic Flush. 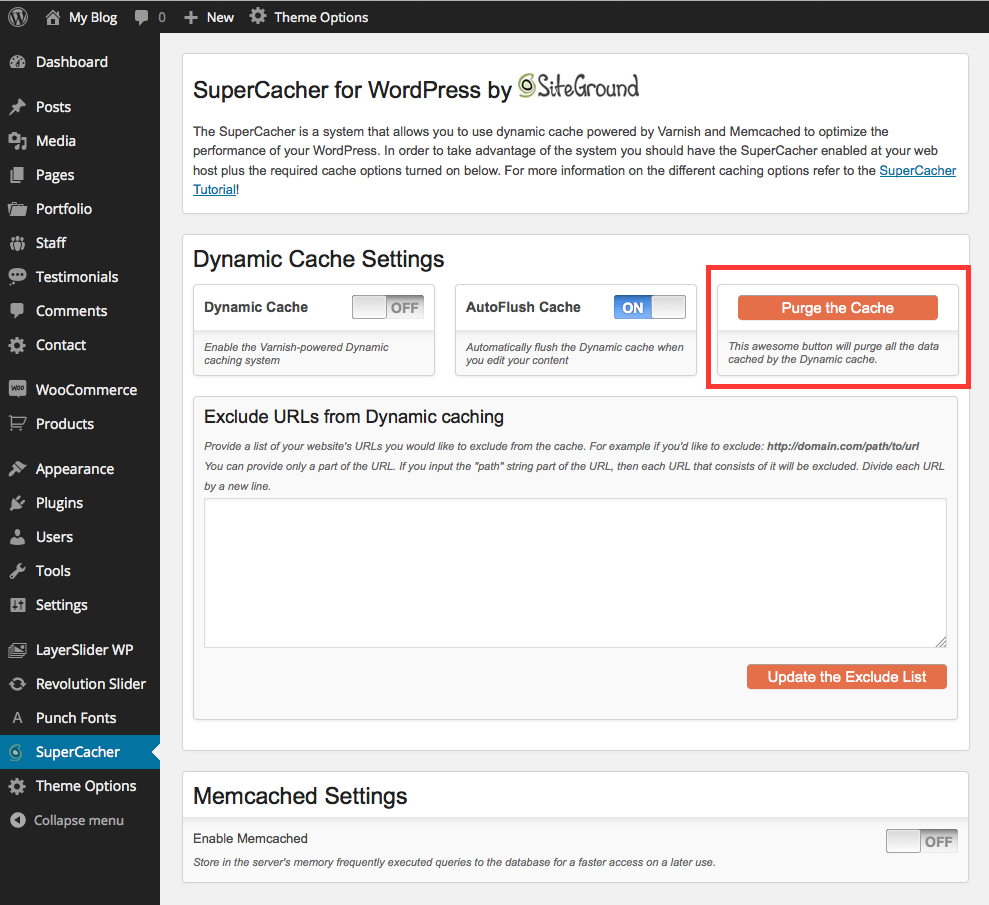 2. Clearing Cache from the Cache Plugins: The best thing is to use WordPress Dashboard and Admin Controlled Caching Plugins. You can manage the Caching from the WordPress Dashboard. We recommend these types of Caching System. WP Rocket In Admin Panel, go to Settings > WP Rocket > Tools Tab and press the Clear Cache Button. 
What Is a Favicon? And How to Add a Favicon to WordPress  A favicon, which is short for ‘favorite icon’ can also be referred to as a site icon. If you look at your browser page now, there will more than likely be a number of favicons displayed. However, you may never have consciously noticed favicons, be aware of what they are or what they do. So what is a favicon and why does your WordPress website need one? What is a Favicon?  A favicon is an icon that is displayed on a browser tab next to a website’s page title. Favicons can also be seen next to a website’s name in a list of bookmarked sites, as well as being used as app icons. Favicons usually take the image of the site logo that they represent. However, they can also be an image that is linked to a site’s branding or style, if this is more suitable. Once a favicon is selected, it shouldn’t be changed, unless your business undergoes a re-brand. That way, your website viewers become familiar with your favicon and recognize it in a lineup of browser tabs. The Importance of Using a Favicon  Favicons are all about visually marketing to, and connecting with, your site visitors. Adding a favicon will enable your audience to subconsciously and instantly identify your WordPress website in a sea of apps or web pages. This familiarity with your favicon will help your audience find you quickly and easily. It will also remind users of your site’s existence, resulting in an increase in traffic and returning visitor numbers. Lastly, a favicon will help your site stand out from your competition and establish your site as a reputable source. As you can see, the benefits of using a favicon are huge. So let’s now find out how you can create a favicon and add it to your WordPress website… Creating a Favicon The first step in the favicon process is to create a suitable image. As mentioned, a favicon should ideally be the same image as your website’s logo, so visitors can immediately recognize it. However, sometimes with complicated logos, this can result in an unclear or confusing favicon. In which case you will have to simplify your logo or use a different image. Make sure choose something that represents your business and obviously reflects your brand. How to Add a Favicon to Your WordPress Website Adding a site icon used to be best left to web developers and those with in-depth coding knowledge. However luckily, after the release of WordPress 4.3, adding a favicon became extremely easy and straightforward. 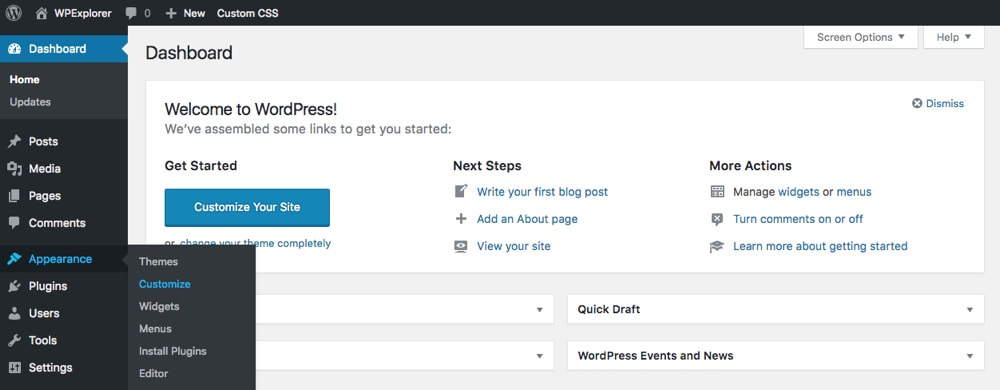 Open your WordPress dashboard and in the menu select Appearance > Customize. This will open the live WordPress customizer with a preview of the homepage of your website. Select Site Identity. Here you will see displayed Site Title and Site Icon. 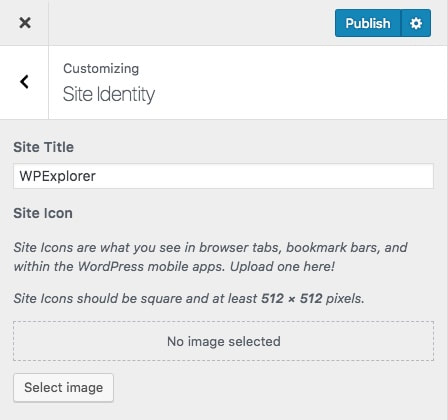 Under Site Icon you can add, change or remove your favicon. Click on Select Image. 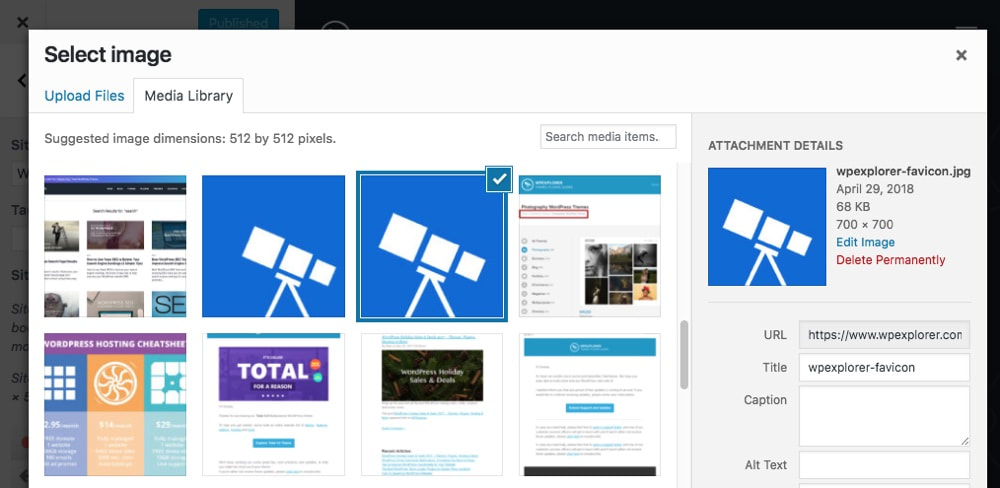 Your WordPress Media Library will now appear on your screen. Select the Upload Files tab and then either drop your favicon image into the box, or select it from your computer. Back in your Media Library, check your image is ticked and then click Select in the bottom right-hand corner. WordPress will now ask you if you would like to crop your image. If you have already edited your image in an editing program, select Skip Cropping. Otherwise, crop away. 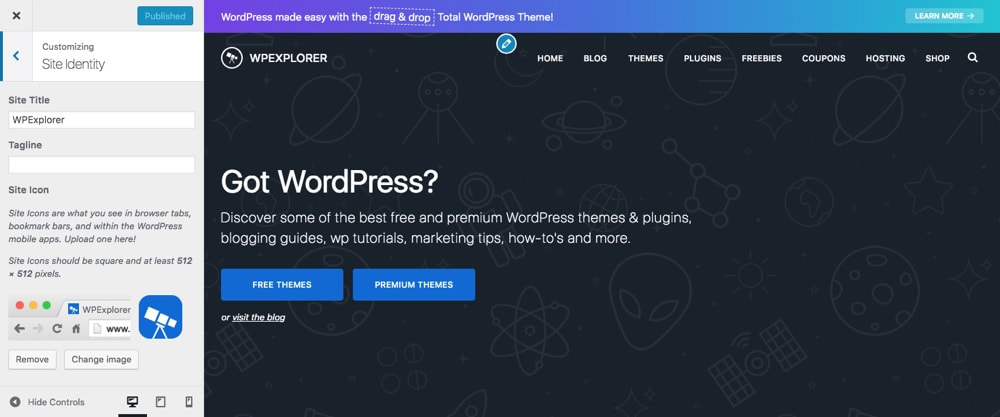 In the customizer, under Site Icon, you will see your uploaded image. Select Save and Publish at the top of the customizer and then refresh the page. You should now be able to view your favicon in your web page browser tab. If at some point you would like to change your favicon, under Site Icon simply select Change Image. However, as mentioned earlier, this is not advised unless you are rebranding. If you continually change your favicon your audience won’t be able to identify which image represents your website when they are viewing their browser tabs or apps. Wordpress is an open source content management system (CMS) which is freely available online. You can build any kind of website very easily on WordPress. For all types of Wordpress Support services you can easily contact us on WordPress Support Number +1-877-863-5655. It is toll free and available 24*7. TAGS:wordpress support,wordpress support service,contact wordpress support,wordpress support number,wordpress customer service number,wordpress support phone number,contact wordpress support,Wordpress Customer Support Number
Address the 6 WordPress Login Issues with These Solutions  The power of WordPress as the web platform is recognized for generations but the flexibility and exceptional ease of use of WordPress do not come without if you instances of occasional frustrations. The most common up such frustrating experiences is the login problem encountered by the user after in case of forgetting the password. After forgetting the login password for the WordPress admin page most users go through a frustrating experience since they do not have any clue about dealing with the issue. To deal with the issue of login into admin page WordPress users actually have an array of effective solutions. Here we are going to introduce six most common WordPress login problems and their respective solutions. 1. Password forgotten or lost This is the most common and most frequent problem experienced by the majority of WordPress users. Many site owners and bloggers change their password regularly to make their web presence secure. While doing so they often have a type tough time by forgetting the login password for the WordPress admin page. When changing password frequently for your website admin page it is quite natural to forget the password and become unable to login in the admin page. The best way to address this issue is to take help from the inbuilt password help within the admin page. Just click on the option entitled ‘Lost your password’. As soon as you click on this there will be a prompt to enter your email address where a link will be sent instantly and by clicking on that you can create a new password for your admin page. This is the most effective solution to the most common login issue for WordPress admin page. 2. Deactivate the Wrong Plugins We all know that the strength of word press platform is its variety of plug-ins that allows exceptional ease of use and versatility. But as for admin page login, some plug-ins can interfere with the data input and thanks to some plug-ins you can face serious login issue. First of all, to address the issue you need to know what plug-in is the culprit and then you have to deactivate the plug-in responsible for the login issue. You can go to the plug-ins folder through the file manager or your FTP client and then you can just change the name of the plug-in folder. This will deactivate all the plug-ins running on your WordPress website and so, going through the step may be a little tricky. Only when you are certain that any of the plug-ins is responsible for the login issue you can take this step. To do this, you firstly need to find your Plugins folder using either the File Manager or your FTP client. Then, you can rename this folder to anything you like; thus, all the Plugins installed on your site will be deactivated for they cannot be recognized by WordPress. Personally, we do not recommend you to delete this folder. After renaming the plug-in folder you should be able to login in the admin page if any of the plug-ins causes the problem. If plug-ins have nothing to do with it, you can again give back the folder its earlier name and can thus reactivate all the plug-ins. After finding that any of the plug-ins is responsible for the login issue you can go to the WordPress plug-in section and deactivate plug-ins one by one and in between after deactivating which plug-in you are able to login as usual. Instead of deactivating the whole plug-in folder this is another way to find the responsible plug-in for the login issue and deactivating it. 3. Fix Your WordPress Login Page Issues by Clearing Cookies WordPress scripts use browser cookies to strengthen the security. Though cookies help look into getting the login information at times they can really cause nightmarish problems by not allowing you to login in the admin page. Among many issues redirecting the user to the login page is a common problem caused by the website cookies. The simplest way to address the issue is to clear the browser cookies on the regular basis which will also enhance the browser performance. 4. Uploading a new login file WordPress login process has its control in the wp-login.php file. In case this file becomes corrupted or is not uploaded in the proper way you may fair face serious login issue in the admin page. Addressing this issue is rather simple and all you need to do is to remove the present WP login PHP file and then upload a fresh copy of the same file again. 5. Matching WordPress URL with website URL First of all, you need to know the difference between the two URLs. While the first one only refers to the location of your WordPress files, the later is the web address of your site. If these two URLs do not match you can have serious login issue on the admin page. As a solution, you need to go to the phpMyAdmin section and take the following measures.
6. Change the theme Did you change your WordPress website theme recently? Well, it can also be the source of the problem. Updating in new theme or changing the previous theme often causes login issue in the admin page. You can always revert back to the previous theme or the default theme to get the problem solved. In case you don't have a default theme for your WordPress website you can solve the problem by directly changing the theme from the theme repository. Just download the current default theme and run it on your website. If a new theme is causing the login page issues it can be solved by reverting back to the default theme. To conclude, When you know how to solve the occasional login issues in admin page and few such problems that are common in WordPress, you can always feel delighted with the powerful user experience of this widely popular CMS platform. Wordpress is an open source content management system (CMS) which is freely available online. You can build any kind of website very easily on WordPress. For all types of Wordpress Support services you can easily contact us on WordPress Support Number +1-877-863-5655. It is toll free and available 24*7. TAGS:wordpress support,wordpress support service,contact wordpress support,wordpress support united states
We’ll start with:
What is Cloud Computing?  According to G2 Crowd, “One of the simplest ways to demonstrate “the cloud” is through storage. Traditional, local storage will keep files on your hard drive. When you save an image or download a program, it is stored on your device. Cloud storage, on the other hand, stores that file on the web. The file is distributed across remote servers and accessed through the internet.” Now extend that concept of “storage” to include processing power and content delivery. You have the modern cloud. Put simply, the cloud is a distributed network of computers, with makes multiple copies of your data in separate machines. So if one server goes down, the other takes over. To the end user, the computation never stops. Different Types of Cloud Computing  There are three primary types of cloud computing solutions based on their deployment. You have public, private and hybrid. Before we begin, you’ll have to understand that ultimately, the cloud is made up of multiple computer (called servers) that are located in data centers.
Leading Cloud Computing Providers  Back when cloud computing started to pick up, AWS had majority of the cloud market share. However in 2018, things have drastically changed. We have multiple industry-leading cloud provides such as AWS, Google Cloud, Microsoft Azure, IBM and Alibaba Cloud to name a few. Cloud Computing and WordPress  Most of the best WordPress hosting providers use one of the leading cloud providers to offer their services. For instance, Kinsta is a popular managed WordPress hosting provider that’s fully hosted in Google Cloud. Other services like Cloudways offers managed cloud WordPress hosting in AWS, Google Cloud and others. They’re essentially a middle-layer service provider, that manages your WordPress site in a cloud provider of your choosing. Wordpress is an open source content management system (CMS) which is freely available online. You can build any kind of website very easily on WordPress. For all types of Wordpress Support services you can easily contact us on WordPress Support Number +1-877-863-5655. It is toll free and available 24*7. TAGS:wordpress support,wordpress support service,contact wordpress support,wordpress support number,wordpress customer service number,wordpress support phone number
Step by step instructions to Fix Briefly Unavailable for Scheduled Maintenance WordPress Error21/12/2018 Step by step instructions to Fix Briefly Unavailable for Scheduled Maintenance WordPress Error  Introduction WordPress undoubtedly is the most powerful content management system today. All thanks to its easy to use interface and simple to manage back-end. However, the problem arises when your WordPress website or blog gets stuck, and keeps on showing ‘Briefly unavailable for scheduled maintenance. Check back in a minute’ error. Accordingly, the webpage shifts into upkeep mode abandoning you stuck in the midst of a critical post refresh, notwithstanding meddling with your site's traffic. Be that as it may, fuss not! In this article, we will guide you when WordPress is stuck in upkeep mode. Why does the Briefly Unavailable For Scheduled Maintenance error occur? In fact talking, the upkeep mode page is really not a blunder, but rather a warning page which discloses to you that a specific refresh is going on. Amid the refresh, WordPress downloads the relating refresh documents to your server. They are then separated and introduced. It is for this period, that WordPress makes a shrouded .upkeep record and puts your site in support mode and presentations a message "Quickly inaccessible for booked support. Return in a moment." Generally, this message is displayed only for a few seconds. However, at times, the web server starts reacting too slowly or a memory issue pops up which leads to an interruption in the update process. This is when the problem starts. As a result, the update process may timeout and WordPress gets no chance to take your website out of the maintenance mode. Until and unless the required script is executed, your website would display the error and would remain stuck in the maintenance mode. This primarily happens when:
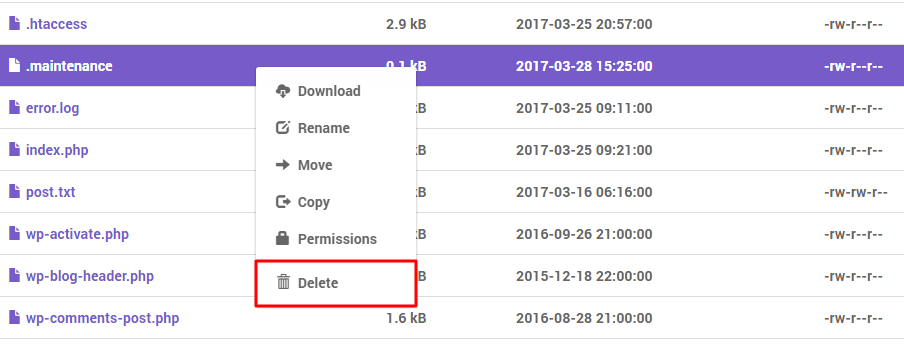
Fixing Briefly Unavailable For Scheduled Maintenance Error WordPress Briefly Unavailable For Scheduled Maintenance mistake can be settled by erasing the .support record physically. .support is a shrouded document which is produced by WordPress in your primary registry each time a refresh occurs. In an ordinary situation – WordPress naturally evacuates this record when the refresh is finished. Be that as it may, if the procedure is interfered with, you may need to do it physically. There are three different ways of doing this current, how about we look at them: Option 1 – Using FTP Follow the below-mentioned steps in order to delete the .maintenance file by using FTP:
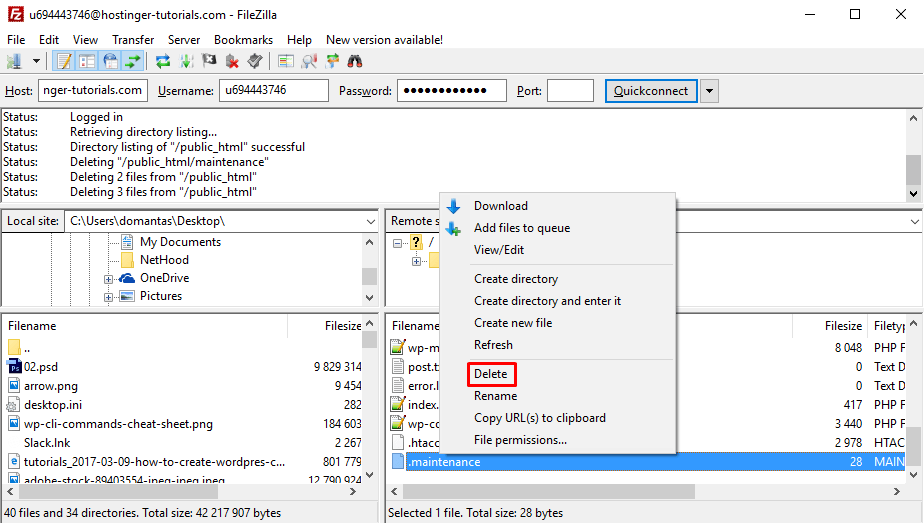 And voila! Your site is active again. Option 2 – Using Hostinger File Manager You can utilize Hostinger document supervisor to get to your site's records situated in the server. Regardless of whether you are not utilizing Hostinger, record administrator given by your host ought not be altogether different. Along these lines, you can in any case adhere to the guidelines beneath. In the event that you confront an issue, contact your host for explicit headings. Access Hostinger control panel and click on File Manager.
 Option 3 – Using SSH The third option to delete the .maintenance file is by using command line:
cd public_html 3.In order to make sure that you are in the correct directory and see all the files in it type: ls -a 4.In order to delete the .maintenance file type: rm .maintenance And you’re done. Conclusion
We hope the above-mentioned tutorial would help you in bringing a WordPress website out of the maintenance mode. If you have any queries, do let us know in the comments. Wordpress is an open source content management system (CMS) which is freely available online. You can build any kind of website very easily on WordPress. For all types of Wordpress Support services you can easily contact us on WordPress Support Phone Number +1-877-863-5655. It is toll free and available 24*7. |


|
